Search This Blog

Tuesday, October 22, 2013

Holiday Tablescapes

I absolutely love creating a beautiful "tablescape" when having guests. Its fun and festive and makes people feel special. Here's some great ideas and looks to consider...


Loove plaid! It's warm and inviting!


Sweet.


I love how simple this is!!


White china and pumpkins make these flowers and the dark wood pop!


I really like this mix of greens, floral, and stripes. 
So much texture going on and the wooden elements tie it all together!


Busy centerpieces like this work well with buffet style eating. 
The table starts clean and simple like this before all the plates and cups come in.

Otherwise...


While visually perfect....it's not very practical. 

A big part of a tablescape is the centerpiece(s)! 
Floral arrangements can't be beat, and a self-prepared one?
super rewarding. This tutorial is amazing....


Holidays are just around the corner!
Thanks for stopping,
Amy

All photos and sources can be found under my Fall/Autumn and Floral Arrangement Pinterest boards.

Tuesday, October 15, 2013

Leafy Creatures/ HOUSE UPDATE!

I saw some adorable DIY leaf animals on Pinterest.
So, you guessed it....I had to give it a try!


Though I wished I'd actually pressed and saved them, the "chicken" I pressed as a tester browned with in a couple days. So these I just photographed. Pretty fun. I feel like they'd make a great children's book.
~
Great news! We accepted an offer on our house! 
Please pray all goes through, 
we're ready for our next endeavor.
(This of course means that I'll be putting our living room project on hold. 
It's painted and looks fresh! I was going to find new seating
 but decided to stop looking for the time being.
 If anything falls through I'll continue the process. 
I'll post pics of the new paint soon anyway, just for fun.)

Thursday, October 10, 2013

Pressed Fall Ferns (How-To)

 It's amazing how many variations of color you find in Autumn ferns! Depending on sunlight and moisture, the ferns turn color at different times and you're left with a beautiful range of yellows, oranges, and golds. I gathered loads of different colors and pressed some into a set of gold vintage frames I've been hanging on to. I've been wanting to do a frame collage wall in our living room once done. I'll be adding these to the mix. Displayed here with some found "heart" rocks, they'll be a lovely addition.


I love the natural chevron-like shape ferns have. 
When displayed together like this they create a graphic all their own. 

Here's what I did, though pretty self explanatory...
Gathered my goods, then picked out frames and scissors.


The "matte" is a vintage wallpaper I've been storing for such projects. 
Any paper or even fabric would work.


I cut the matte to fit the frame...


Laid it on top of fern and trimmed edges of fern to size.


Extra trimming may be necessary once you turn it to position how you want it.


Lay glass back on top.


Carefully slide ALL of it back into frame at once.
(Trust me, don't try to layer each thing one at a time....Headache! :) )


Slide the back in and you're done :)!


So far the color has remained the same as the day I made them!
Even if they only last this season, so worth it. 
They really look pretty.

I hope your Fall is going well!
Stay warm & cozy,
Amy


Saturday, October 5, 2013

DIY Autumn Display How-To

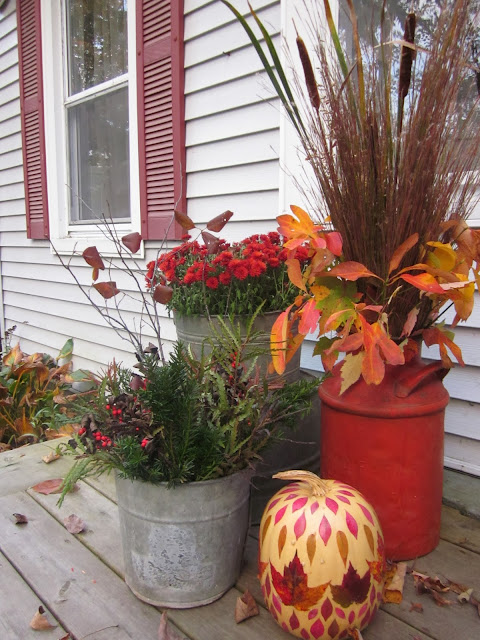
I'm feeling so festive this year! The foliage is probably the best I've seen it in years and any time I'm out for a drive I want to stop every two seconds and collect. Leaves. Branches. Berries. Ferns. Everything :)!  So the other day I decided I was going to make a trip of it. I went out with scissors in hand and clipped oodles of goods for a Fall display.
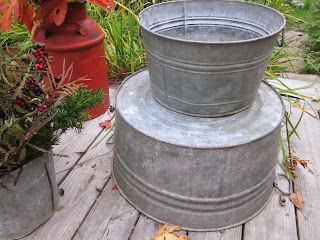
I've had this wonderfully rustic barn-red milking jug and the wash basins for a long time and decided they'd be perfect to house all my finds. Maybe you'll feel inspired to go out and collect. Its so easy, gives a welcoming feel to your entry, and it's FREE.


Here's a little How-To.

What you'll need: 
-Containers (Depending on the plant, water may be necessary.
A vase can fit inside a container if too big.)
-Foliage, branches, berries, greens, etc.
-Scissors/Knife


I suggest dividing your goods separately for easy arranging. 
Fill your container/vase with water.

Start by filling your vase with a "filler" such as grass or leafy branches.
Then start adding the "accents"; Colored leaves, branches, cat tails,
and other special things you may not have as many of.
I added the colored leaves around the outside rim so they'd drape nicely. 


(Notice the little helping hands above... ;)! )

Then I put the cat tails and tall leaf branches in the center of the grass since they're tallest.


Once I got everything I could squeeze in
 I stood back and made a few adjustments.


Then I put a rock in the bottom of the milk jug to fill some space
 and lowered the vase in carefully. 


~

I did the same thing using an old mop bucket, 
but didn't use water for it as these plants dry out nicely...


I'm not sure what this plant is but it's a ground covering weed of some sort 
that smells really nice and has varying colors in the Fall. 
I used this as my filler.


Look at the nice variety of color..so pretty!...


Then I added some dried berry branches, tall leafy branches, 
greens, and a few pine-coned branches.


This bucket will carry through really nicely into the winter time.

~

Lastly I put my mum into a small wash basin and 
displayed it on top of a larger one for height.


Now you get to arrange them all.


(See my last post for pumpkin details.)


There you have it! 
Super easy, inexpensive and best of all, 
it looks soo cozy & festive!

I hope you feel inspired to try your own!
If so, I'd looove to see your pictures when done!
~Amy

Next post: Pressed Autumn ferns, so pretty.

Thursday, October 3, 2013

Our Latest Fall-Inspired Projects and Happenings

My mom, niece Whitney, Avie and I had a little Fall craft day yesterday. I was eager to try this project that I saw on Pinterest....


So we went out for a nature walk, collecting leaves in our little red apple buckets.
Then we sat down to decoupage. So fun! Whitney painted a large pumpkin while we shuffled through the leaves finding the right color and shapes...


Avie helped out by eating... :)


Whitney proceeded to "paint" Auntie's door, with the unwanted help from Avie... Haha.
"No Abie....No."

After lots of decoupage, here's a look at the outcome. 
Mom had to leave early for Whitney's dance class ;) so hers is still in progress. 
I love the fern-like leaves she used, though, and wanted you to see it.


I loved these fuchsia- toned leaves. 


And here's Whitney's master piece!... 
I'm sure it would be worth millions if pumpkins only lasted... :)


All in all a great time together. 
Nothing like sharing these kinds of projects and fun with the ones you love!

OTHER FALL HAPPENINGS:

My hubby, Avie and I have done lots of Fall hiking..


The leaves were just starting to change and we came across 
multiple ponds and river openings that boasted beautiful foliage views!


Our little cliff hanger!


Each time we had a cozy picnic..


And Avie-girl had her first tootsie pop. :) Needless to say my hair was.... sticky.

Avie popped her first tooth and has pulled herself up to her feet!!
She's so close to walking!


We attended a friend's amazing Autumn wedding this weekend. 
Such a lovely view and perfect weather!


Little Whitney was a flower girl! And to the left my sister-in-law Kim and her adorable
prego belly! She looked amazing, and is due Oct 18th!!!!!! (BOY!)


(You can kinda see my ombre hair that I previously posted about having done. Very subtle reds.)


She is becoming a Daddy's girl! Forget Mamma. ;)


Her old-man face...Hehehe.


Coloring with Grammy and Grampy at the reception. These water-marker
books are GENIUS!!! 


And fun with Whitney including BUBBLES!!


(Jut look at Whitney. Can we say CUTE?!)


All in all a wonderful Fall so far, filled with family, friends, and lots of fun!
I'm a thankful girl!
~